How to speed up Windows 10 using Ready Boost
Looking for an inexpensive way to give your Windows 10computer a boost in performance? Do you have a USB flash drive and a spare USB port on your computer? Then ReadyBoost in Windows 10 might be a perfect solution
If you have never heard of ReadyBoost, it is a program that caches files that are frequently used by Windows 10. It stores the cached files on USB flash drive(s) or SD memory card.
ReadyBoost utilizes a service called SuperFetch. SuperFetch uses an algorithm that determines which files should be stored in the cache. The cache can include system files, application files and user documents.
Now when those files are needed, instead of reading the files from the disk drive, they get read from the ReadyBoost cache instead. If a file gets changed on the disk drive, it also gets changed in the cache and visa versa.
Now it is recommended that you use only USB flash drives for ReadyBoost for desktop computers. It can be connected to either a USB 2 or USB 3 port, but a USB 3 port is recommended. But you can use an SD memory card for a laptop computer, as long as it has a fast-enough transfer rate.
And you can use more than one (1) USB flash drive for ReadyBoost. In fact, the recommended ratio between the ReadyBoost cache and system memory is 1:1 to 2.5:1.
So, if your computer has 8GB of memory, you could create a ReadyBoost cache that is between 8GB and 20GB. But you could just use a 32GB flash drive and allocate all of it to ReadyBoost.
The one thing you need to know is ReadyBoost is mainly meant to be used with systems that only have Hard Disk Drives (HDD), since they are known to have slower read access times than Solid State Drives (SSD).
ReadyBoost requirements for Windows 10
- Minimum free space per flash drive / memory card: 1 GB
- Maximum free spade per flash drive / memory card: 32 GB
- Minimum transfer rate: 3.5 Mbit/s.
- The flash drive / memory card format: NTFS
Now to make sure that your computer is ready to use ReadyBoost, you will need to make sure the SuperFetch service is running. To check the status of the SuperFetch service just follow these steps:
- Open a Run dialog box by pressing the Windows Logo key
 + R.
+ R. - In the Open field type services.msc and then click on OK.
- Scroll down the list of services until you find SuperFetch.
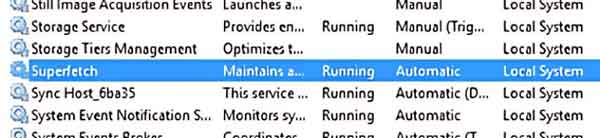
- Make sure it is running and set to start Automatically.
You are now ready to set up a USB flash drive or SD memory cardfor use with ReadyBoost. Just insert the drive into a spare USB port or SD card slot and follow the instructions below.
How to turn ReadyBoost on or off inside of Windows 10
- Insert the USB flash drive or SD memory card you want to use with ReadyBoost.
- Open File Explorer by using one of the following:
- Left-click on the manila folder icon to the Taskbar. or
- Press the Windows Logo key + E at the same time.
- Navigate to the USB flash drive or SD memory card you want to use with ReadyBoost.
- Right-click on the drive you want to use for ReadyBoost..
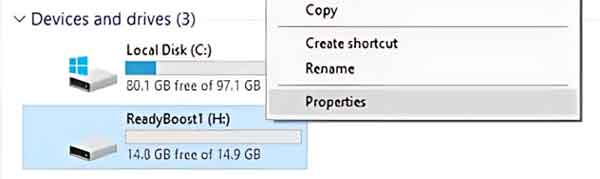
- From the context menu that appears, left-click on Properties.
- On the Properties dialog box, left-click on the ReadyBoost tab.
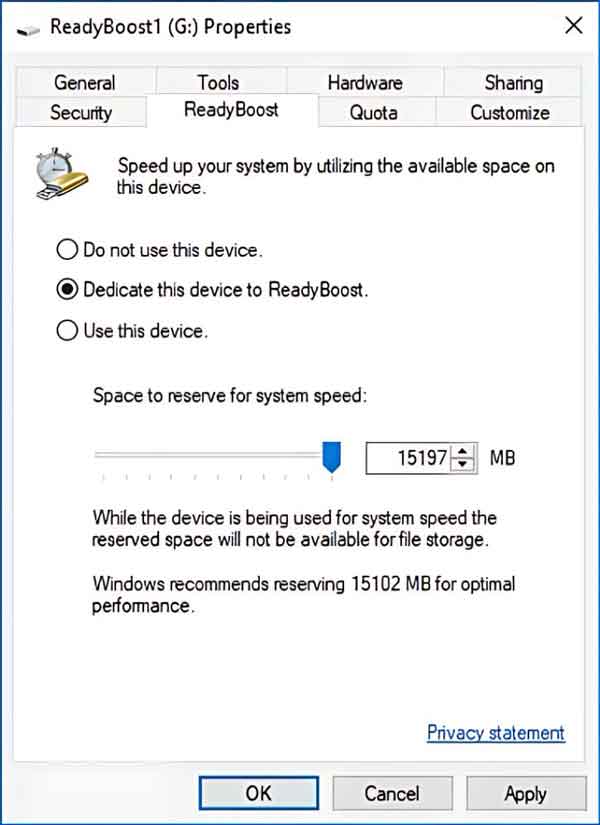
- Once the system has analyzed the drive, select the options you want to use.


