How to get a free Windows 10 upgrade for Windows 7 and Windows 8.1
A lot of people took advantage of the Get Windows 10 upgrade promotion and but some did not. If you are one of those people that did not get your version of Windows 7 / Windows 8.1upgraded for free, you still have an opportunity to do so. Here is how to get a free Windows 10 upgrade for Windows 7 and Windows 8.1.
So, it has been a few years now since Microsoft ran the Get Windows 10 promotion and now you think you might like to get your version of Windows 7 or Windows 8.1 upgraded to Windows 10. The question is now, should you upgrade your computer to Windows 10?
If you think so, I will let you know a little secret, you still can get the upgrade for free. But there is a certain way you have to go about doing it. And there are some prerequisites you have to meet first.
First, your computer needs to be running a legally licensed, not pirated, version of Windows 7 Service Pack 1 or Windows 8.1. The key here is running, as you will need to start the upgrade process from inside of Windows. In essence, you will be performing what is called an in-place upgrade.
And since this is an in-place upgrade, you will need to know what edition of Windows you have. Just open a Run dialog box, type Winver and left-click on OK. The Windows edition will be listed in the About Windows screen that appears. Here are the upgrade paths.
- If you have Windows 7 Starter, Windows 7 Home Basic, Windows 7 Home Premium or Windows 8.1 Home Basic, you will upgrade to Windows 10 Home.
- If you have Windows 7 Professional, Windows 7 Ultimate or Windows 8.1 Professional, you will upgrade to Windows 10 Professional. An upgrade path for Enterprise versions of Windowsis not supported.
Second, your computer needs to meet the hardware requirements for Windows 10. The majority of computers running Windows 7 / 8.1 already meet the requirements, but there are exceptions. There are certain graphics processors are known to be incompatible.
But the only way you are going to find out is by actually starting the upgrade process. The Windows 10 installer will run a check for hardware that will not work with Windows 10 and give you a choice to stop the upgrade or continue.
If it turns out that the on-board graphics processor in your desktop computer is incompatible, you can always install an inexpensive (under $50) PCI-e graphics card (if you have an open PCI-e slot). Here is how to add an expansion card to your desktop computer. If your laptop has an incompatible graphics processor, you will not be able to upgrade it to Windows 10.
But there are a few things I recommend doing before starting the upgrade process. Checking for drive errors, cleaning up your drive and uninstalling third-party anti-virus / malware software are just a few. And definitely creating a full backup just in case something goes wrong. Just follow steps #2 through #6 in this article, 7 things to do before and after upgrading to Windows 10.
Now there is a dirty little secret about upgrading to Windows 10that nobody ever talks about, and that is the original recovery media. Almost all computers come with a hidden partition that contains a copy of the original software that came with your computer.
When you perform an upgrade to Windows 10, that media is replaced with a copy of Windows 10. So, if you ever want to go back to the version of Windows that came with your computer, you will need to create the recovery media before doing the upgrade. Check out thee section 'Make the recovery media' in the following article, five things you should do first when you get a new computer.
So now you have got everything taken care of and you are ready to start the Windows 10 upgrade. Since this is going to be an 'in-place upgrade', you are going to need the Windows 10 installation media. Let's go ahead and make it.
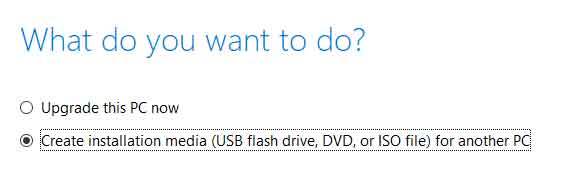
First thing you have to do is download and run the Windows 10 Media Creation Tool. This program can do a direct upgrade or create the Windows 10 media (USB or ISO file).

I recommend creating the media (either USB or ISO), that way if you have a copy of Windows 10, just in case you need it in the future.

I recommend creating the media (either USB or ISO), that way if you have a copy of Windows 10, just in case you need it in the future.
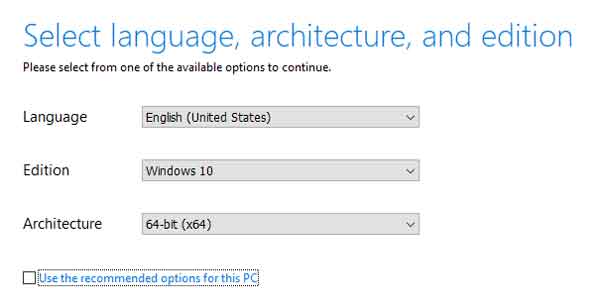
The next thing you need to do is select what language, architecture and edition you want to install.

If the Use the recommended options for this PC check box is on the bottom, go ahead and make sure it has a check mark inside of it. If not, refer to the edition information you collected earlier.

If the Use the recommended options for this PC check box is on the bottom, go ahead and make sure it has a check mark inside of it. If not, refer to the edition information you collected earlier.
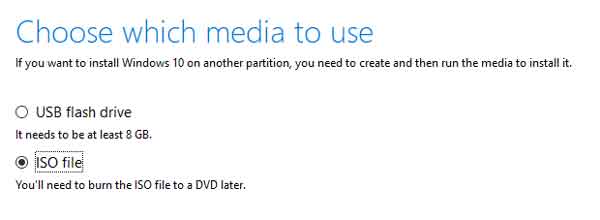
You will need either a blank DVD or USB drive that is 8GB or larger. The Windows 10 Media Creation Tool will format a USB drive and make it ready to use.

If you download an ISO file, you will need to burn it to a DVD. Here is how to burn an ISO file to a disk.

If you download an ISO file, you will need to burn it to a DVD. Here is how to burn an ISO file to a disk.
There are a couple of reasons to install from media (USB or DVD) and not the Windows 10 Media Creation Tool. The #1 reason is you can always easily restart the installation if you need to take care of an issue or two.
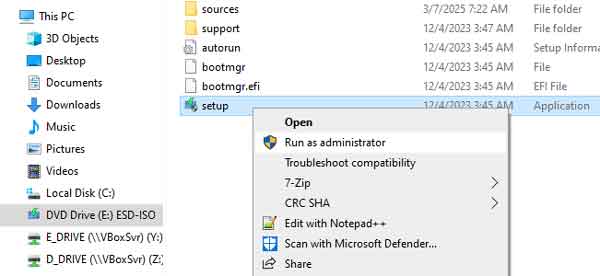
Once you have the installation media created, you will have to start the upgrade by running the setup program located in the root of the installation media.

I recommend opening File Explorer and right-clicking on setup.exe and selecting Run as administrator.

I recommend opening File Explorer and right-clicking on setup.exe and selecting Run as administrator.
Now that the installation has started, you will be prompted to download any updates or wait. You will be downloading the updates either now or after the installation is done, so it is strictly your call.
At some point the installation is going to check the hardware and software currently installed. If it finds any incompatible software, like an anti-virus program, you may have to cancel the installation and remove the software.
If the installation finds incompatible hardware, you may have to cancel the installation so that you can resolve the issue. Either way, you may be able to continue the installation, but that depends on how critical the Windows 10 installer finds the software / hardware issue to be.
Once the upgrade is in process, it may take a couple of hours to complete. When it is all done, Windows 10 will convert your original product key that was stored on your computer to one that is stored on the cloud. It is called digital entitlement.
And if you ever need to reinstall Windows 10, all you have to do is download the latest version using the Windows 10 Media Creation Tool. It is the one Windows 10 feature you hope you never have to use.
