• This is Slide 1 Title

    This is slide 1...

  • This is Slide 2 Title

    This is slide 2...

  • This is Slide 3 Title

    This is slide 3 ...

pfSense with Captive Portal

pfSense with Captive Portal

Sign-in to the pfSense Firewall administration console.
Navigate to Services -> Captive Portal and add a new zone representing network that should be protected with a Captive Portal with RADIUS authentication - test_zone in our example.
Configure Zone, important parts are:
Authentication -> RADIUS Authentication (MSCHAPv2 works best)
Primary Authentication Source - RADIUS details from our Console -> Networks -> Captive Portals -> RADIUS for splash page
Accounting - enable and enter Accounting port if you wish to collect accounting information about your users including their current online status
RADIUS options - Reauthentication - enable if you wish to disconnect the user from our Console or via our REST API
Portal Page Contents - upload our Authentication page. You can download the page from Console -> Networks -> Captive Portals -> Controller Configuration -> Portal pages contents
Logout Page Contents - replace with our Logout page. You can download the page from Console -> Networks -> Captive Portals -> Controller Configuration -> Portal pages contents. This will allow you to collect session information that can be used to disconnect user from our Console or REST API.
Click on the Save button to apply new settings.
Click on Allowed IP addresses Tab and add IP addresses and networks that the user should be allowed to access before authentication. Typically, you will enter the IP addresses from the Walled garden that will include IP address of the External Captive Portal, Google, Facebook, LinkedIn, PayPal, SAML Identity Provider or any other Authentication Provider you select.
Please all IP addresses and hostname from IronWifi console
Click on the Save button to apply new settings.

Optional: PfSense + OpenWrt - PfSense as shared captive provider

Go to Network → Interfaces and select the Lan interface.
00


01
Set an IP next to your main router on the field "IPv4 address". (If your main router has IP 192.168.1.1 set 192.168.1.2)
02
02a
02b
Then scroll down and select the checkbox "Ignore interface: Disable DHCP for this interface." - only if you like to have unlimited amount of clients, otherwise DHCP just assign only in defined radius
03
03a
03b
04
In the top menu go to System, then Startup, disable Firewall in the list of startup scripts.
05
06
Click the Save and Apply button. Hard-Restart your router if you're not able to connect anymore.
07
08
09
Now connect to the new IP you have just specified(192.168.1.2) and check if the settings for the LAN interface are the same you set before.
Verify that your LAN interface is up and online
10
Connect to your AP, if you had created and set-up pfSense splash page correctly (have created splash page, added at least one Authentication method, applied settings to pfSense), you should be able to login via captive splash page now if you try to access any website.
Important: CONNECTION TO AP/ROUTER MUST BE IN THE LAN PORT!
Link to original how-to.

Also, there is simple diagram how connection pfSense + OpenWRT works:
schema
Simple written:
PC asks for internet from AP, AP forwards it into pfSense, pfSense asks IronWifi if is valid or not, if not pfSense send captive page to PC, PC now must confirm that is valid via captive page, next time process ends in valid without need of captive page check.

Windows 10 Update So Much?

Windows 10 Update So Much?

Microsoft says Windows 10 is a “service,” and the company updates it frequently with security patches, bug fixes, and new features. Updates normally happen automatically in the background, so let’s demystify that: Here’s what Windows is installing and when.

How Often Does Windows 10 Check for Updates?

Windows Update settings on Windows 10
Windows 10 checks for updates once per day. It does this automatically in the background. Windows doesn’t always check for updates at the same time every day, varying its schedule by a few hours to ensure Microsoft’s servers aren’t overwhelmed by an army of PCs checking for updates all at once.
If Windows finds any updates, it downloads and installs them automatically.
While Windows 10 does check for updates once per day, that doesn’t mean it’s installing them every day. Microsoft doesn’t release Windows Updates every day, so Windows Update will often find no updates available and not install anything.

Definition Updates Arrive Multiple Times Per Day

Update history showing malware definition updates on Windows 10
Microsoft’s Windows Defender application, now known as Windows Security, is an antimalware (antivirus) application built into Windows 10. It runs automatically in the background and protects your PC. If you install a different antivirus, the built-in Windows antivirus disables itself and lets your antivirus of choice work.
Like all security applications, Microsoft’s antivirus needs regular definition updates, so it can identify and catch the latest discovered malware. These updates are small, quick, and don’t require a reboot. You won’t even notice your PC is installing them unless you open the Windows Update page in Settings and are keeping an eye on it.
To check when definition updates were installed, head to Settings > Update & Security > Windows Update > View Update History, scroll down, and expand “Definition Updates.”
You can check how often definition updates are being installed by heading to Settings > Update & Security > Windows Update > View Update History, scrolling down, and expanding the “Definition Updates” section.
RELATED: What’s the Best Antivirus for Windows 10? (Is Windows Defender Good Enough?)

Driver Updates Arrive Occasionally

Driver update history in Windows 10's Settings
Hardware drivers are the bits of software that enable hardware devices like your sound, Wi-Fi, graphics, printer, and other PC components. Hardware manufacturers sometimes release new versions of these drivers with bug fixes or other improvements.
Windows Update also delivers hardware driver updates for your PC. Hardware manufacturers give new hardware drivers to Microsoft, and Windows Update downloads them to your PC. How often your PC receives driver updates depends on the hardware devices it contains and how often the hardware manufacturers are releasing updates.
You may have to restart your PC for driver updates, depending on the driver.
A list of installed driver updates can be found under “Driver Updates” on Settings > Update & Security > Windows Update > View Update History.

Cumulative Updates Arrive Once Per Month

Quality updates in Windows 10's settings
Microsoft releases a “quality update” to Windows every month on the second Tuesday of each month, which is known as “Patch Tuesday.” These are big updates that contain security fixes as well as other bug fixes. They’re called cumulative updates because they bundle a large number of fixes—even fixes from previous updates, ensuring you just have to install one big cumulative update even if your PC is off for a few months.
Technically, it’s a little more complicated than this. Patch Tuesday’s cumulative update is known as a “B update” because it’s released in the second week of the month. There are also “C” and “D” updates released in the third and fourth weeks of the month. These contain bugfixes and other improvements, but you’ll only get them if you manually click the “Check for Updates” button. If you never do that, you’ll receive these bugfixes in next month’s B update on Patch Tuesday.
Cumulative updates require a reboot. They touch important files that can’t be modified while Windows is running.
You can view the list of cumulative updates Windows has found from the Update History page, too. Head to Settings > Update & Security > Windows Update > View Update History, scroll down, and expand “Quality Updates.”
RELATED: Now Windows 10 Has C, B, and D Updates. What is Microsoft Smoking?

Out-of-Band Updates Arrive in Emergencies

While Microsoft normally waits to release security updates as part of Patch Tuesday’s B updates once per month, it sometimes releases “out-of-band” updates. These are called that because they’re released outside of the normal schedule.
These are generally released in emergencies—for example, when there’s a zero-day security flaw being exploited in the wild and the problem must be fixed immediately.
These updates generally require a reboot, too.

Feature Updates Arrive Every Six Months

The latest installed feature update in Windows 10's settings
Microsoft also releases big, major versions of Windows 10 once every six months. It calls these “feature updates.” They include lots of changes and improvements. For example, Windows 10’s April 2019 Update will add a light desktop theme with a new default desktop wallpaper, and many, many other smaller changes, including improved Start menu file searchand low-level improvements that will make Windows 10 run faster.
However, these don’t always roll out immediately. Microsoft throttles it and tries to only offer your PC an update if the company thinks it will run well on your hardware. You may not get these every six months if you don’t go out of your way looking for them. For example, Windows 10’s October 2018 Update still isn’t on most Windows 10 PCs at the end of February 2019.
These big updates always require a reboot. They require a much longer installation process, so you’ll spend more time staring at a blue screen while the process finishes. The length of the update process depends on how fast your PC is and the update—Microsoft has been speeding up the installation process over the last few versions.
If you see a “Working on Updates” screen with a notice that “Your PC will restart several times,” Windows is probably installing a feature update.
As with C and D updates, you’ll generally be offered this update after release if you go into the Windows Update screen in Settings and click “Check for Updates.” That makes you a “seeker” and Microsoft will give you the update even if it didn’t think that update was ready for your PC’s hardware. Yes, it’s a strange way of doing things.
You can see the last installed feature update from the Update History screen. Look under “Feature Updates” at the top of the Settings > Update & Security > Windows Update > View Update History screen.

How to Control When Windows Updates

Advanced options for pausing and delaying updates on Windows 10
Windows 10 updates automatically and doesn’t give you anywhere near as much control as Windows 7 did, especially on Windows 10 Home.
You can still prevent Windows from automatically installing updates and rebooting during certain hours of the day. Just change the “Active Hours” to the times you use your PC. For example, if you regularly use your PC from 6 p.m. to 10 p.m., ensure those are marked as your active hours. Windows 10 won’t install updates during those hours. You can set up to 18 hours of each day as your active hours.
To prevent Windows from automatically downloading and installing updates on a connection, you can set the connection as metered. Windows will only download certain critical, small updates and won’t download and install most updates automatically. This setting is designed to save data on connections with limited data, but you can enable it on any connection—even a wired Ethernet connection.
Windows 10 Professional users can also access additional updates for pausing, deferring, and otherwise delaying updates after they’re more tested on consumer PCs. Windows 10 Home may finally let you pause updates when the April 2019 update arrives, too.

Quick Ways to Speed Up a Slow PC Running Windows 7, 8, or 10

Quick Ways to Speed Up a Slow PC Running Windows 7, 8, or 10

Windows PCs don’t have to slow down over time. Whether your PC has gradually become slower or it suddenly ground to a halt a few minutes ago, there could be quite a few reasons for that slowness.
As with all PC issues, don’t be afraid to give your computer a reboot if something’s not working properly. This can fix quite a few problems and is faster than attempting to manually troubleshoot and fix the problem yourself.

Find Resource-Hungry Programs

Your PC is running slow because something is using up those resources. If it’s suddenly running slower, a runaway process might be using 99% of your CPU resources, for example. Or, an application might be experiencing a memory leak and using a large amount of memory, causing your PC to swap to disk. Alternately, an application might be using the disk a lot, causing other applications to slow down when they need to load data from or save it to the disk.
To find out, open the Task Manager. You can right-click your taskbar and select the “Task Manager” option or press Ctrl+Shift+Escape to open it. On Windows 8, 8.1, and 10, the new Task Manager provides an upgraded interface that color-codes applications using a lot of resources. Click the “CPU,” “Memory,” and “Disk” headers to sort the list by the applications using the most resources. If any application is using too much resources, you might want to close it normally — if you can’t, select it here and click “End Task” to force it to close.

Close System Tray Programs

Many applications tend to run in the system tray, or notification area. These applications often launch at startup and stay running in the background but remain hidden behind the up arrow icon at the bottom-right corner of your screen. Click the up arrow icon near the system tray, right-click any applications you don’t need running in the background, and close them to free up resources.

Disable Startup Programs

RELATED: How to Make Your Windows 10 PC Boot Faster
Better yet, prevent those applications from launching at startup to save memory and CPU cycles, as well as speed up the login process.
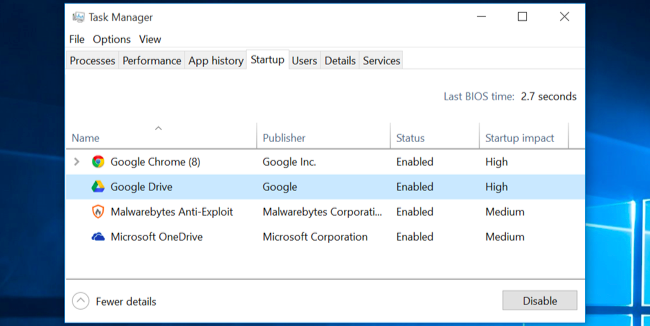
On Windows 8, 8.1, and 10, there’s now a startup manager in the Task Manager you can use to manage your startup programs. Right-click the taskbar and select “Task Manager” or press Ctrl+Shift+Escape to launch it. Click over to the Startup tab and disable startup applications you don’t need. Windows will helpfully tell you which applications slow down your startup process the most.

Reduce Animations

RELATED: Speed Up Any PC, Smartphone, or Tablet By Disabling Animations
Windows uses quite a few animations, and those animations can make your PC seem a bit slower. For example, Windows can minimize and maximize windows instantly if you disable the associated animations.
To disable animations, press Windows Key + X or right-click the Start button and select “System.” Click “Advanced System Settings” on the left and click the “Settings” button under Performance. Choose “Adjust for best performance” under Visual Effects to disable all the animations, or select “Custom” and disable the individual animations you don’t want to see. For example, uncheck “Animate windows when minimizing and maximizing” to disable the minimize and maximize animations.

Lighten Your Web Browser

RELATED: How to Enable Click-to-Play Plugins in Every Web Browser
There’s a good chance you use your web browser a lot, so your web browser may just be a bit slow. It’s a good idea to use as few browser extensions, or add-ons, as possible — those slow down your web browser and cause it to use more memory.
Go into your web browser’s Extensions or Add-ons manager and remove add-ons you don’t need. You should also consider enabling click-to-play plug-ins. Preventing Flash and other content from loading will prevent unimportant Flash content from using CPU time.

Scan for Malware and Adware

RELATED: What’s the Best Antivirus for Windows 10? (Is Windows Defender Good Enough?)
There’s also a chance your computer is slow because malicious software is slowing it down and running in the background. This may not be flat-out malware — it may be software that interferes with your web browsing to track it and add additional advertisements, for example.
To be extra safe, scan your computer with an antivirus program. You should also scan it with Malwarebytes, which catches a lot of “potentially unwanted programs” (PUPs) that most antivirus programs tend to ignore. These programs try to sneak onto your computer when you install other software, and you almost certainly don’t want them.

Free Up Disk Space

RELATED: 7 Ways To Free Up Hard Disk Space On Windows
If your hard drive is almost completely full, your computer may run noticeably slower. You want to leave your computer some room to work on your hard drive. Follow our guide to freeing up space on your Windows PC to free up room. You don’t need any third-party software — just running the Disk Cleanup tool included in Windows can help quite a bit.

Defragment Your Hard Disk

RELATED: Do I Really Need to Defrag My PC?
Defragmenting your hard disk actually shouldn’t be necessary on modern versions of Windows. It’ll automatically defragment mechanical hard drives in the background. Solid-state drives don’t really need traditional defragmentation, although modern versions of Windows will “optimize” them — and that’s fine.
You shouldn’t worry about defragmentation most of the time. However, if you do have a mechanical hard drive and you’ve just put a lot of files on the drive — for example, copying a huge database or gigabytes of PC game files — those files might be defragmented because Windows hasn’t gotten around to defragmenting them yet. In this situation, you might want to open the disk defragmenter tool and perform a scan to see if you need to run a manual defrag program.

Uninstall Programs You Don’t Use

Open the Control Panel, find the list of installed programs, and uninstall programs you don’t use and don’t need from your PC. This can help speed your PC up, as those programs might include background processes, autostart entries, system services, context menu entries, and other things that can slow down your PC. It’ll also save room on your hard drive and improve system security — for example, you definitely shouldn’t have Java installed if you’re not using it.

Reset Your PC / Reinstall Windows

RELATED: Everything You Need to Know About “Reset This PC” in Windows 8 and 10
If the other tips here didn’t fix your problem, the one timeless solution to fix Windows problems — aside from rebooting your PC, of course — is getting a fresh Windows installation.
On modern versions of Windows — that is, Windows 8, 8.1, and 10 — it’s easier to get a fresh Windows installation than ever. You don’t have to get Windows installation media and reinstall Windows. Instead, you can simply use the “Reset your PC” feature built into Windows to get a new, fresh Windows system. This is similar to reinstalling Windows and will wipe your installed programs and system settings while keeping your files.

If your PC is still using a mechanical hard drive, upgrading to a solid-state drive — or just ensuring your next PC has an SSD — will offer you a dramatic performance improvement, too. In an age where most people won’t notice faster CPUs and graphics processors, solid-state storage will offer the single biggest boost in overall system performance for most people.
Security and your computer

Security and your computer

With the recent outbreak of data encrypting malware, keeping your computer secure is a major issue. There isn't just one thing that you can do to secure your computer, but multiple. So here are few ways to make sure your computer is as secure as possible.
Security and your computer

Operating system security

Is your device up to date?
Keeping your operating system up to date is essential for security. Microsoft does a pretty good job of issuing patches and updates for Windows, especially when a new vulnerability is discovered.
But if you are not keeping your OS up to date with patches and updates, you could be making your computer vulnerable to any current or future exploits. And if you are still using an OS like Windows XP or Windows Vista that does not have support from Microsoft anymore, you need to upgrade your OS.
If you have turned off Windows Update, turn it back on. And if Windows Update is not working correctly, here is how to fix it.

Anti-virus security

Is your anti-virus up to date?
A good anti-virus program is required for security. You can get an anti-virus program that has all of the bells and whistles (firewall, identity protection, custom browser, etc.). Or you can get one with just a virus scanner. Either way, you have to have some form of protection.
Now Microsoft has been including an anti-virus program inside of Windows for a while (Windows Defender) and it works fairly well. But there are plenty of other anti-virus programs out there, including a security suite your Internet Service Provider (ISP) may provide.
But if you want to know how they all stack up, just go over to the independent IT security institute AV Test. They test all of the most popular anti-virus programs on a regular basis. They also cover multiple platforms too (Windows, Mac and Android).
I personally like using a layered approach to my computer security, using different programs that complement each other.

Web browser security

Is your web browser up to date?
Having a secure web browser is mandatory in my book. And since web browsers have really become targets for online exploits, you need to know your browser is safe and secure.
I personally like the fact that Google Chrome and Mozilla Firefoxcheck for updates when you start them up. And they also get updated more frequently than Internet Explorer or Microsoft Edgedoes.
There are two (2) things I like to do to my browsers to improve their security:
  1. Disable Adobe Flash. Hackers have been exploiting Adobe Flash for years now by getting bogus Flash ads into third-party ad networks.
  2. Anti-virus. I prefer an anti-virus program that integrates into the browser using an extension or add-on.
And since ads also are becoming an issue, I will sometimes recommend using an ad blocker like Adblock Plus. They have a version for almost every browser you can think of.

E-mail security

Is your e-mail secure
Is your e-mail secure?
E-mail is currently one of the most popular ways to spread malware. You have to be very carefully with what e-mail attachments you open. Knowing how to spot a piece of spam e-mail is essential.
I personally use the anti-spam program Mailwasher to filter out the junk and spam from my e-mail. I also have configured my anti-virus program to monitor Mailwasher for viruses, even though Mailwasher by default renders all mail in text format and cannot open attachments.
But when Mailwasher does download a suspicious attachment, my anti-virus program will scan it and flag it as such. I use the Pro version, but Mailwasher does have a free version that is sponsored by advertising.

Password security

Are your passwords secure?
Reusing passwords is a big security no-no. It's nice to be able to easily remember your passwords, but it can be a nightmare if someone were able to guess them. That is why you do not want to use the same password over and over again.
If you are like me, coming up with a unique password for every different place you log into can be really hard. Luckily there are password generators that can make it easy to create really secure passwords. One of my favorites is the Norton Identity Safe Password Generator.
Using the Norton Identity Safe Password Generator, you can create passwords up to 32 characters long that have mixed case letters, numbers and punctuation with no similar characters.
Now that you have generated a secure password, why not test it out. Gibson Research Corporation (GRC) has a bunch of cool security tools on their website, one of them being Password Haystack.
Password Haystack is a brute force password calculator that will tell you how long it will take to guess any password. Go ahead and enter your favorite password and see how long it can take to guess it. You may be surprised at how little time it can take to crack it.

Laptop and PC Repair Service

Laptop and PC Repair Service

Is the performance of your computer not what it used to be? Maybe you're getting errors at start up or during normal operation. Or maybe your computerpc or laptop has just stopped running. Computer repair is what we do best!
Free computer diagnostics, system building and hardware replacement / upgrades are a few of the computer repair services we provide.
We provide a wide range of services that are customized to meet your needs. From free computer diagnostics and system building to hardware replacement and upgrades, we cover it all. With experience with Windows 3 to Windows 10, we can take care of all of your computer repair / pc repair / laptop repair needs.
Network connectivity / troubleshooting, memory upgrades and computer cleaning / maintenance are a few of the computer repair services we provide.
We offer computer repair service for all major computer brands including DellHP (Hewlett-Packard), AsusAcerLenovoSonyToshibaSamsungCompaq and Gateway. We also assemble and repair custom built computers too.
Need help setting up a wired or wireless network? Or are you having problems connecting to the Internetnetwork printer, etc. We can help! From wired networks to wireless (Wi-Fi), we have you covered.
Here are a few of the computer repair services we offer:
  • Free Computer Diagnostics
  • Memory Upgrade
  • Hard Drive Replacement / Upgrade
  • Motherboard Replacement
  • Power Supply Replacement
  • Video Card Replacement / Upgrade
  • Computer Cleaning and Maintenance
  • Network Connectivity Troubleshooting
  • System Building
  • And more ...
Infotech Expart is an IT consulting company specializing in all aspects of Computer Repair / PC Repair / Laptop Repair.our expert computer repair technicians have been providing outstanding Computer RepairVirus RemovalData Recovery and Website Support.  


What you can do with an ISO file

What you can do with an ISO file

Have you ever downloaded an ISO file and did not know what to do with it? More and more software companies are now distributing their software using ISO files. Here is what you can do with an ISO file.
What you can do with an ISO file
Nowadays, it seems like everyone is starting to use ISO files for distributing software. In fact, ISO files are just an image of a CD or DVD disk. You commonly see them used to deliver software that is bootable.
Now really quick, ISO stands for International Organization for Standardization. They have a set standard (ISO 9660) for the file system used for optical disks (CD, DVD, BD, etc.).
Even Microsoft is now using ISO files for distributing Windows. If you download Windows 7Windows 8.1 or Windows 10 from Microsoft, you will get the option of downloading an ISO file.
But once you download the ISO file, what can you do with it? If you are running Windows 7Windows 8.1 or Windows 10 you have basically three (3) options; mount it as a virtual optical drive, burn it to a disk or create a bootable USB drive.
You can also create your own ISO image files. For more information, check out How to create ISO files from your software disks.

How to mount and access files in an ISO file

By default, Windows 8.1 and Windows 10 have the ability to mount an ISO file as a virtual optical drive built-in. Windows 7requires a third-party program to mount an ISO file.
Once you mount an ISO file as a virtual optical drive, you can then access the files and folders inside of it. Most of the time you will use this feature to run a software installation.
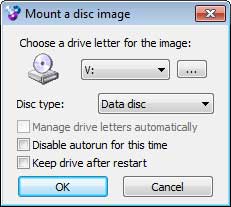
For Windows 7, we are going to use the open source optical drive emulator WinCDEmu. Just download and install it using the default settings. Once it is installed, the process for mounting a ISO image is almost the same as Windows 8.1 or Windows 10.

Windows 7

  1. Open Windows Explorer by using one of the following:
    • Left-click on the manila folder icon to the Taskbar.
    • or
    • Press the Windows Logo key Windows logo key + E at the same time.
  2. Navigate to the ISO image you want to open.
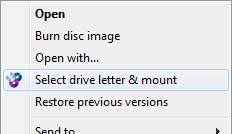
  3. Right-click on it and select Select drive letter and mount on the context menu that appears.
    The Mount option highlighted on the ISO file context menu inside of Windows 7
  4. On the WinCDEmu screen that appears, select the drive letter you want to use for the virtual optical drive and left-click on OK.
    The main screen for WinCDEmu
  5. Using Windows Explorer, navigate to the virtual drive you just mounted. You can now use it as you would with any other physically attached optical drive.
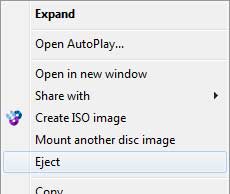
  6. When you are done, you can remove the virtual optical drive by right-clicking on it and selecting Eject on the context menu that appears.
    The Eject option highlighted on the ISO file context menu inside of Windows 7

Windows 8.1 and Windows 10

  1. Open File Explorer (name changed in Windows 8.1) by using one of the following:
    • Left-click on the manila folder icon to the Taskbar.
    • or
    • Press the Windows Logo key Windows logo key + E at the same time.
  2. Navigate to the ISO image you want to open.
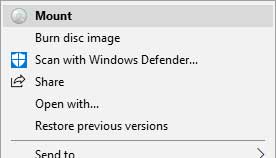
  3. Right-click on it and select Mount on the context menu that appears. Windows 8.1 and Windows 10 automatically assign the next available drive letter.
    The Mount option highlighted on the ISO file context menu inside of Windows 10
  4. Using File Explorer, navigate to the virtual drive you just mounted. You can now use it as you would with any other physically attached optical drive.
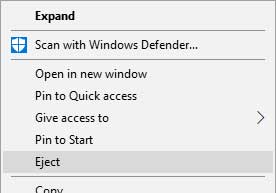
  5. When you are done, you can remove the virtual optical drive by right-clicking on it and selecting Eject on the context menu that appears.
    The Eject option highlighted on the ISO file context menu inside of Windows 10

How to burn an ISO image file to a disk

The process for burning an ISO image to disk is exactly the same for Windows 7Windows 8.1 and Windows 10. Just make sure you have the correct blank media for the disk you want to burn.
For example, if your ISO file is under 700 MB's (Megabyte), it will fit on a CD. If it is between 700 MB's (Megabyte) and 4.7 GB's (Gigabyte), then it will fit on a DVD. If it is between 4.7 and 8.5 GB's (Gigabyte), it will fit on a Double Layer DVD. Anything over 8.5 GB's (Gigabyte) and it is going to go on a BD.
For more information on Megabytes and Gigabytes, check out What is a Bit? What is a Byte?.

Windows 7, Windows 8.1 and Windows 10

  1. Open Windows Explorer (Windows 7) or File Explorer (Windows 8.1, Windows 10) by using one of the following:
    • Left-click on the manila folder icon to the Taskbar.
    • or
    • Press the Windows Logo key Windows logo key + E at the same time.
  2. Navigate to the ISO image you want to burn to disk.
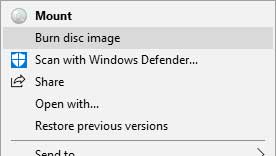
  3. Right-click on it and select Burn disk image on the context menu that appears.
    The Burn disk image option highlighted on the ISO file context menu inside of Windows 10
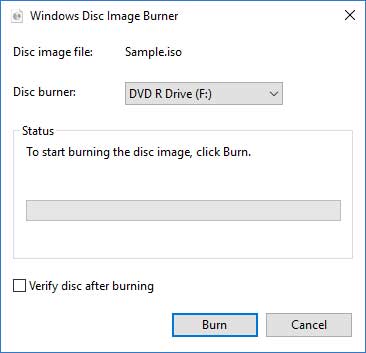
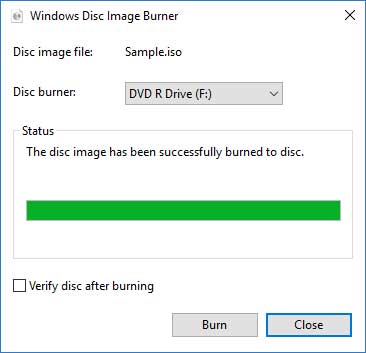
  4. From the pull-down menu on the Windows Disc Image Burnerscreen, select the optical drive you want to use for burning the disk. You also have the option to verify the disk after it is created. When you are ready, left-click on the Burn button.
    The main Windows Disc Image Burner screen inside of Windows 10
  5. When the optical drive is finished burning the disk, just left-clickon the Close button.
    The Windows Disc Image Burner screen verifying the disc has been burned inside of Windows 10

How to create a bootable USB drive from an ISO file

When you want to create a bootable USB drive, you will need one that is empty or one that you do not mind if it gets erased. If the USB drive you want to use has been used before, double check it to make sure there is nothing on it you want to keep.
Remember to use a USB drive that is larger than the ISO file you want to put on it. A good rule of thumb is to use one that the capacity is more than 4GB. I prefer using 8GB or larger.
To create a bootable USB drive will require downloading and installing a separate program. There are several out on the Internet, but here are the two (2) most popular programs.
This free tool is mainly meant for creating bootable Window 7 USB drives from downloaded installation media. It is recommended to only install it on Windows 7, as the system requirements do not list support for Windows 8.1 or Windows 10.
The thing about Rufus is it requires no installation, just download it and it is ready to go. And there are a lot more options including partition schemefile system and cluster size. You also have more boot options including MS-DOS and FreeDOS.