• This is Slide 1 Title

    This is slide 1...

  • This is Slide 2 Title

    This is slide 2...

  • This is Slide 3 Title

    This is slide 3 ...

How to configure Windows Sandbox

How to change Time and Date using Command Prompt

How to transfer files and folder using Command Prompt

Top 10 Google Chrome tips

Below is a listing of all the major shortcut keys used with the Google Chrome Internet browser. See the computer shortcuts page if you are looking for shortcut keys used in other programs.

Shortcut KeysDescription
Alt+HomeOpen your homepage.
Alt+Left ArrowBack a page.
Alt+Right ArrowForward a page.
F11Display the current website in full-screen mode. Pressing F11 again will exit this mode.
EscStop loading the page or a download from loading.
Ctrl+(- or +)Zoom in or out of a page, "-" will zoom out and "+" will zoom in on the page.
Ctrl+1-8Pressing Ctrl and any number 1 through 8 moves to the corresponding tab in your tab bar.
Ctrl+9Switch to last tab.
Ctrl+0Reset browser zoom to default.
Ctrl+EnterThis combination is used to quickly complete an address. For example, type "computerhope" in the address bar and press Ctrl+Enter to get https://www.computerhope.com.
Ctrl+Shift+DelOpen the Clear browsing data window to quickly clear private data.
Ctrl+Shift+BToggle the bookmarks bar between hidden and shown.
Ctrl+ASelect everything on a page.
Ctrl+DAdd a bookmark for the page currently opened.
Ctrl+FOpen the "find" bar to search text on the current page.
Ctrl+OOpen a file in the browser.
Ctrl+Shift+OOpen the Bookmark manager.
Ctrl+HOpen browser history in a new tab.
Ctrl+JDisplay the downloads window.
Ctrl+K or Ctrl+EMoves your text cursor to the omnibox so that you can begin typing your search query and perform a Google search.
Ctrl+LMove the cursor to the browser address bar and highlight everything in it.
Ctrl+NOpen New browser window.
Ctrl+Shift+NOpen a new window in incognito (private) mode.
Ctrl+PPrint current page or frame.
Ctrl+R or F5Refresh the current page or frame.
Ctrl+SOpens the Save As window to save the current page.
Ctrl+TOpens a new tab.
Ctrl+UView a web page's source code.
Ctrl+WCloses the currently selected tab.
Ctrl+Shift+WCloses the currently selected window.
Ctrl+Shift+TThis combination reopens the last tab you've closed. If you've closed multiple tabs, you can press this shortcut key multiple times to restore each of the closed tabs.
Ctrl+TabMoves through each of the open tabs going to the right.
Ctrl+Shift+TabMoves through each of the open tabs going to the left.
Ctrl+Left-clickOpen a link in a new tab in the background.
Ctrl+Shift Left-clickOpen a link in a new tab and switch to the new tab.
Ctrl+Page DownOpen the browser tab to the right.
Ctrl+Page UpOpen the browser tab to the left.
SpacebarMoves down a page at a time.
Shift+SpacebarMoves up a page at a time.
HomeGo to top of page.
EndGo to bottom of page.
Alt+Down ArrowDisplay all previous text entered in a text box and available options on a drop-down menu.

How to Integrate IDM into Opera Browser for Opera

Simple Solution To integrate IDM into opera browser. Opera needs to be integrated manually with IDM and this tutorial will show you how to. To integrate IDM into opera browser there are a few manual tweaks you need to make. By default Internet download manager integrates automatically into some major browsers like Chrome and Firefox, Opera on the other hand does not always get automatic integration with IDM.
Note that Opera versions 14 and lower have limited support of IDM and do not work with IDM extension.
Before we begin make sure both Opera and IDM are up to date. Update Opera to the latest version. Update by Opera by going to ‘Opera > Menu > About Opera > Check for Updates’. Update IDM to the latest version by going to “IDM Menu> Help->Check for updates” located at the Top menu items list.

Follow these Simple Steps to integrate IDM (Internet Download Manager) into Opera Browser

Step 1. Enable Advanced Browser Integration In IDM

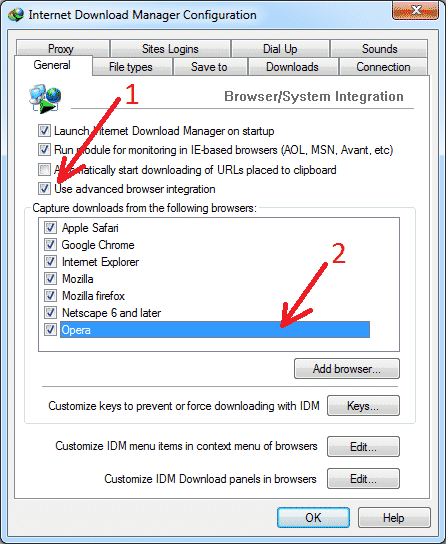
First Open IDM and Go to “Options->General” IDM dialog box (arrow 1 on the image). Enable “Use advanced browser integration” option (arrow 1 on the image). . Now check that integration into Opera is also enable or ticked (arrow 2 on the image). To enable IDM in Opera Browser tick the “Opera” check box. Click OK to save on the dialogue box to save your settings.
IDM Configuration Opera Integration
IDM Opera Integration

Step 2. Open Opera Browser Extensions Page

This step relates to only for Opera versions 15 and higher.
In this step we will install the IDM extension for Opera Browser Manually. This is similar to installing Browser addons for Chrome or Firefox. First Open the Opera Browser extension page.
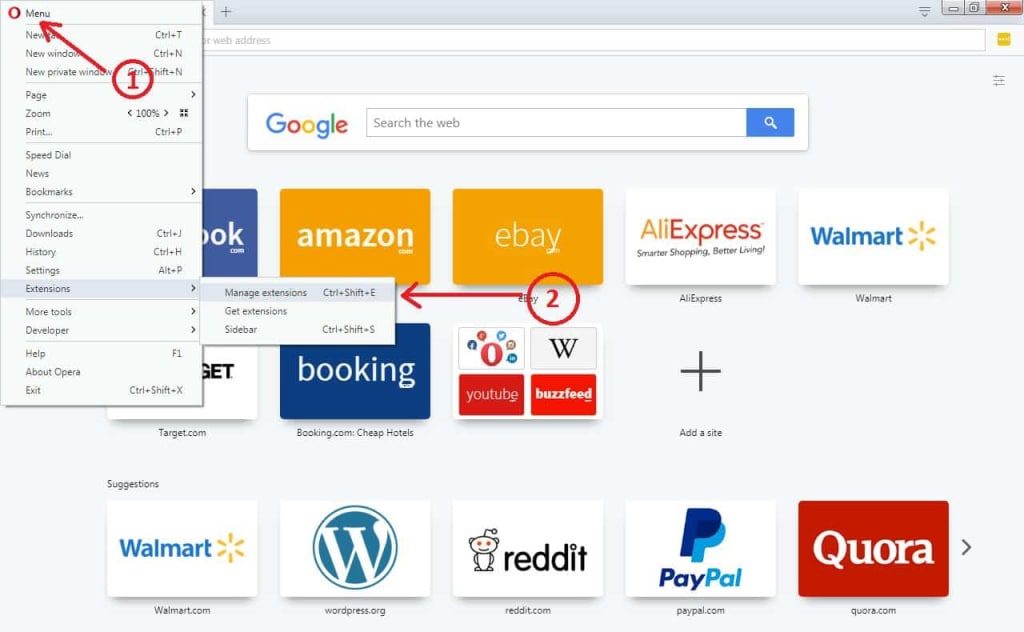
Go to Opera > Menu > Extensions > Manage Extensions
Opera Browser Menu Extensions Manager
Locate Opera Browser Extensions Manager in Menu
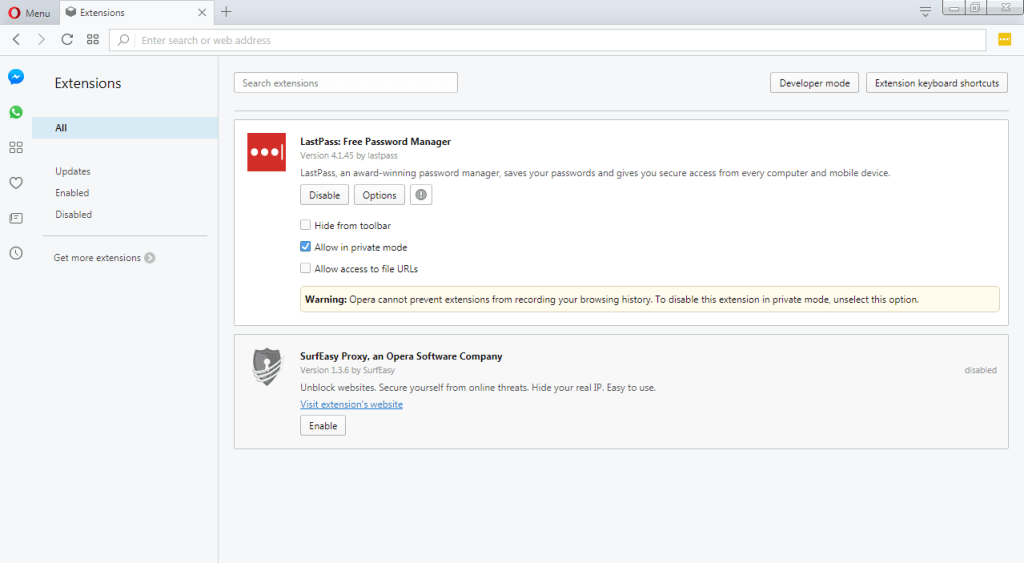
This will open the Opera Extensions page, captured below.
Opera Extensions Manager Page
Opera Extensions Page

Step 3. Open IDM Installation Folder and find IDMGCExt.crx

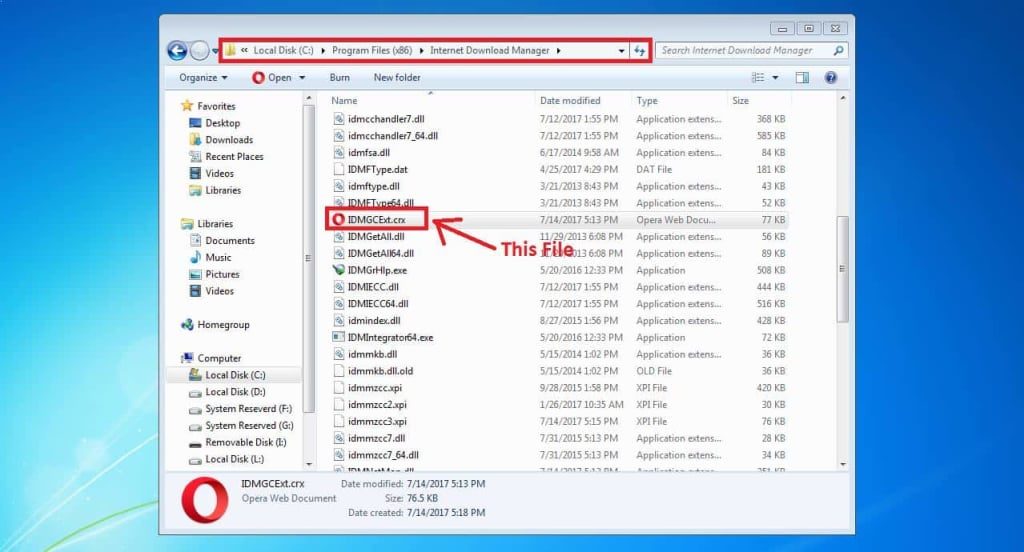
Open the IDM installation folder usually located at “C:\Program Files (x86)\Internet Download Manager” by default (With no quotes). In the folder located or search for a file named “IDMGCExt.crx” or “IDMGCExt” (With no quotes). The “IDMGCExt” file is the IDM extension for Opera.
IDM Installation Folder IDMGCExt.crx
IDMGCExt.crx in IDM Installation Folder

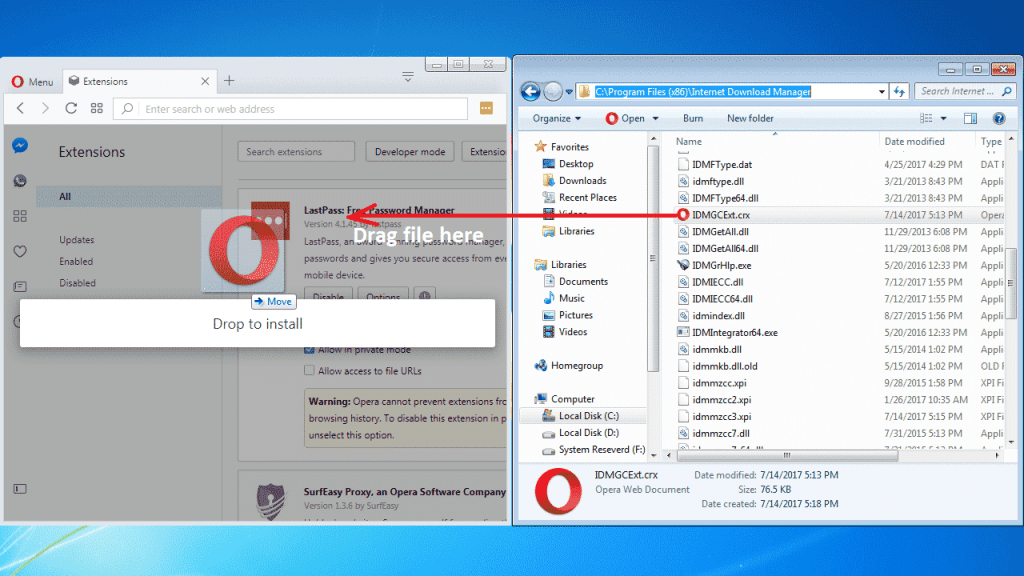
Step 4. Drag and Drop IDMGCExt.crx into Extensions Page

Now simply drag and drop “IDMGCExt.crx” (arrow 4 on the image) file from  IDM installation folder into the “Extensions” page opened in your Opera Browser.
Drag and Drop IDMGCExt.crx in Opera Extentions Page
Drag and Drop IDMGCExt.crx into Extentions Page

Step 5. Accept Install of IDM Integration Module

After the drag and drop a message prompt will pop up asking you to accept installation of the IDM Integration Module. Click on “Install” (arrow 1 on the image) to finish installation of “IDM Integration Module” in Opera Browser.
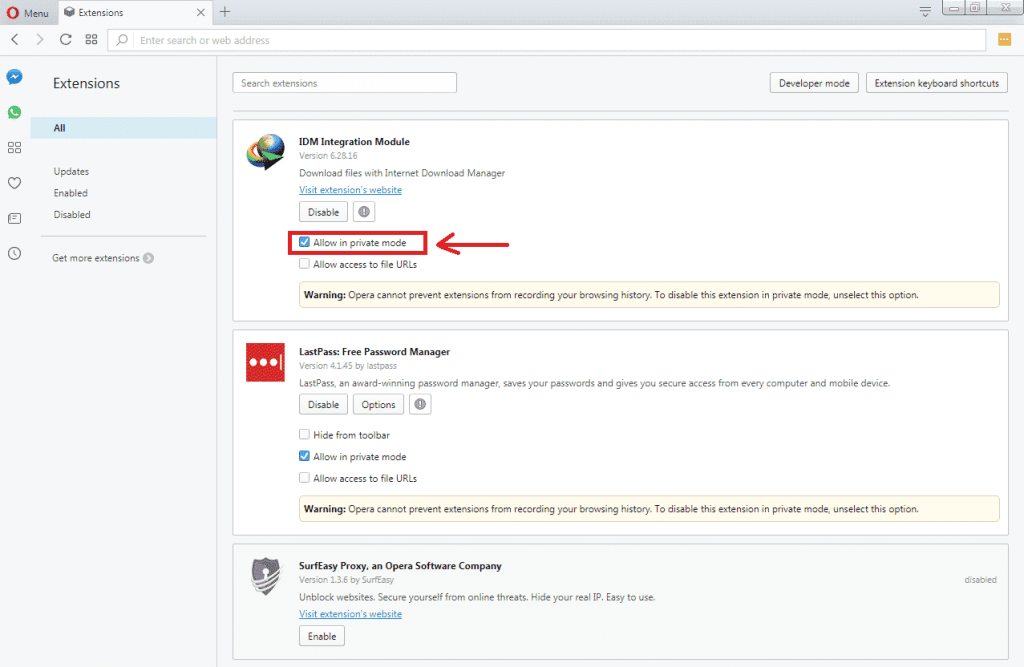
Allow IDM in private mode

Step 6. (Optional) Allow IDM in Private Browsing Mode

Final Step is to enable “Allow in private mode” by ticking the checkbox (arrow 2 on the image). Restart the browser and you have successfully integrated IDM into Opera Browser.
Allow IDM in private mode
Allow IDM in Private Mode
Congratulation you have successfully integrated Internet Download Manger (IDM) with Opera Browser!

Kernel for MBOX to PST

Migrate from MBOX/MBX/MBS Emails to PST, DBX, MSG, EML, Office 365 and Exchange Server

  • Convert MBOX/MBX/MBS/MSF emails to Outlook PST
  • Export MBOX/MBX/MBS to Office 365
  • Support multiple MBOX files migration at a time
  • Converts all emails and attachments to PST, DBX, MSG and EML
  • Saves MBOX mailbox items to Exchange Server, Domino, GroupWise
  • Filters emails by different criteria—From, To, Subject, Date, and attachment
  • Allows detailed preview of mailbox items before saving
  • Supports all MS Outlook versions
  • Process of MBOX to PST Conversion
    The migration of MBOX mailboxes to Outlook PST file can be accomplished in three steps after the selection of the email client. The steps involved are explained as below.
    Software Specifications
    SystemRequirement
    ProcessorPentium Class
    Operating SystemWindows 10, 8.1, 8, 7, Vista, XP
    Memory + Hard Disk64 MB Minimum
    50 MB of disk space
    LicenseType
    Home LicensePermits home users to use the software on single system
    Corporate LicenseFor multiple machines within one organization at single location
    Technician LicenseFor service providers to use for multiple organizations
    SoftwareDelivery & Version
    ElectronicYes
    Version18.1
    Date First AvailableView History
    AdditionalInformation
    What’s NewView all
    Case StudyView all
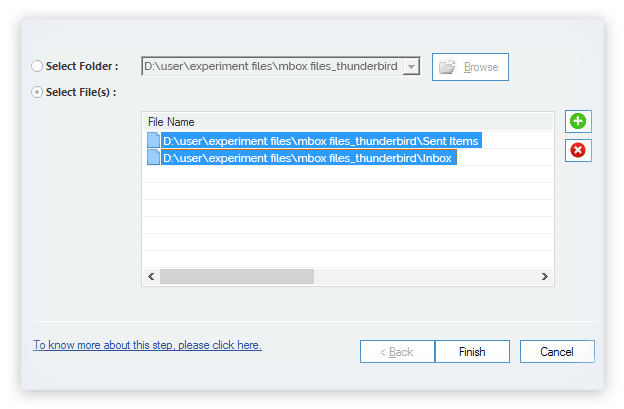
    Add the folder containing the MBOX files

Dashboard for Blogger Templates

 Sneeit Spot V3.9
Dashboard for Blogger Templates


Sneeit Spot will help you changing settings, translating and updating your Blogger templates easily. I call it “Sneeit Spot”, a  bookmarklet for dashboard of Blogger templates”.
Your Blogger templates, of course, must be compatible with bookmarklet first, so you need to ask your author to confirm before using or you can read in your Blogger templates’s documentation to know if they support this stuff.

Install Sneeit Spot

Note: At this time, Sneeit Spot work well with Chrome only. As webmasters, we recommend you using Chrome to manage your admin dashboard.
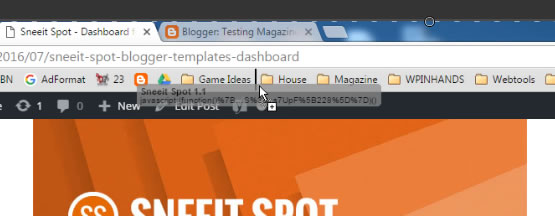
Drag the bookmarklet below to your bookmarks bar of your browser. Then, when you’re on your template HTML editor, you just simply click it if you want to use Sneeit Spot to set up your Blogger templates.

If you are not sure how to install, check below image for more information:
Hold and drag the button to your bookmarks bar then edit your Blogger templates and click the button


Update Sneeit Spot

Each time I release a new version, I will change the version text of the above bookmarklet so you can compare that text with the bookmarklet on your bookmarks bar. For example, if our text is 3.0 and your text is 2.9, so you need to update Sneeit Spot.
If the text not match, you will need to right click on the bookmarklet on your bookmarks bar and remove it. Then going to this page and install the bookmarklet again.

Using Sneeit Spot

Note: If the tool not work properly, just reload your website and launch it again.

Updating Your Template

Login to your blog dashboard, choose Template / Edit HTML and then launch Sneeit Spot by clicking it on your browser bookmark bar.

Activate Template

You will need to be a member of Sneeit to work with this feature. If you are not, please login or create a new account.
If you purchased item from Envato (ThemeForest / CodeCanyon) , you will need to access Envato API tab in your profile to input Envato Username, Envato API Key, and Item Purchase Code . If you did not, skip this.
Now, you can access Sneeit Licenses tab in your profile, input your website into Your Website URL field, click Submit Website button. After that, you will see your website is being listed in license Your License Keys list, so you just need to copy the key under your website domain.
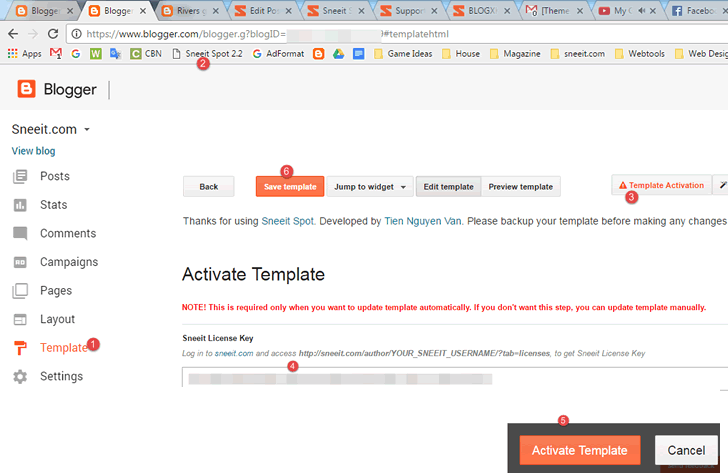
Go back to your template editor, launch Sneeit Spot, click Template Activation, and paste the key you copied above into Sneeit License Key, then click Activate Template button and then Save Template button.
Activate-Blogger-Template
Activate Blogger Template with Sneeit Spot

Activate AMP Feature

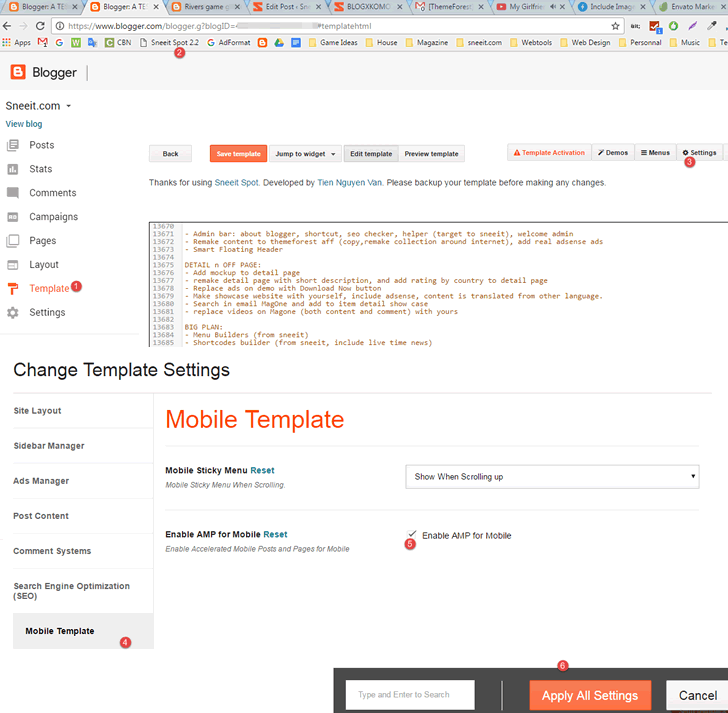
Access your Template Editor, launch Sneeit Spot, click Settings button, choose Mobile Template (or Responsive in some cases) tab and opt-in the Enable AMP for Mobile option. Then click Apply All Settings button and then Save Template button.
You will still need to use Sneeit Spot to apply AMP standard for your posts to make theme 100% compatible with AMP.

De-active AMP Feature

May be you will feel annoyed with Google Search Console errors when it shows a lot of AMP error. This is because we can apply AMP for POSTS only on Blogger, but other pages (like search, labels, dates, …) will still get errors (we must accept this weakness of Blogger at this time). So if you don’t want to see those errors, you have to De-active AMP and stop using it for your site.
To de-active AMP, access your Template Editor, launch Sneeit Spot, click Settings button, choose Mobile Template (or Responsive in some cases) tab and opt-out the Enable AMP for Mobile option. Then click Apply All Settings button. 
And then search in your template code:

amp=''
and remove it then click Save Template button.

Apply AMP for Posts

If your template supports AMP, you will need to activate your template and then using Sneeit Spot to apply AMP to your posts to make them 100% validated AMP standard.
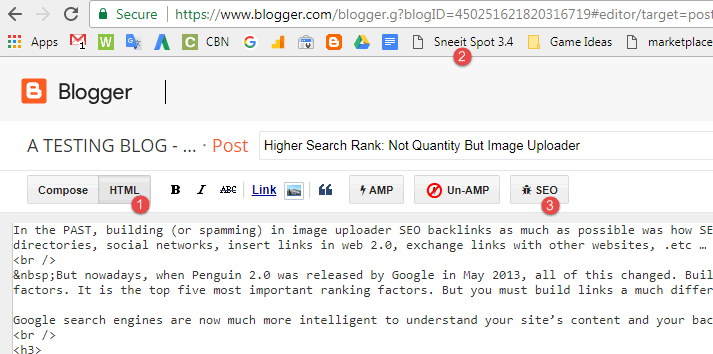
When you are in Post Editor, before publishing or updating post, you have to switch to HTML mode(if you did not, all your content can be wiped), click Sneeit Spot button on your bookmark bar. After that,  and you will see the AMP button. Click it to apply AMP for your post.
Apply-AMP-Blogger-Blogspot-Post
Apply AMP for Blogger / Blogspot Posts
If you don’t want to activate template, you can manually apply AMP standard for your posts follow AMP Guides Here
Warning: Because AMP not allow JavaScript so all features which is related to JavaScript will be disabled and show as raw code (include smart content, shortcodes, .etc, ..).

SEO Checker

Only activated templates can use this feature. When you are in Post Editor, you have to switch to HTML mode and click Sneeit Spot button on your bookmark bar. After that,  and you will see the SEObutton on editor toolbar. Click it to see your SEO Score and also the analysis which will report you what are the things you need to do to improve your post’s SEO score.
Sneeit Spot SEO Checker


Android PC Using Phoenix OS

Android PC Using Phoenix OS

Phoenix OS also includes improvements to Android, such as automatically preventing apps from running in the background. In addition to speed, the OS also receives regular updates. These features have contributed to its recent increase in popularity. A few China-only hardware companies will release tablets and miniPCs with Phoenix OS as its primary operating system — for example, the Pipo P10 2-in-1 tablet.
Not all hardware is (fully) compatible with Phoenix OS. In many ways, it suffers from the same weakness and shortcomings as Linux: namely that it won’t work with all hardware. And even when it does work, it will lack certain features, like audio through an HDMI connection.
As an aside, you can test Phoenix OS out from within a virtual machine, such as VMware or VirtualBox. The Phoenix OS images for both are found over at OSBoxes.org.

Requirements for Installing Phoenix OS

Phoenix OS Hardware Requirements

Phoenix OS only requires an Intel or AMD x86 processor (Intel Atom recommended) and internal storage with at least 2GB of space. I recommend using at least 16GB drives. In order to install Phoenix OS, you will need a USB drive with at least 8GB of storage.
Requirements:
  • 2GB storage drive
  • Intel or AMD processor made around 2012 or later, preferably an Intel Atom processor
  • An 8GB or larger USB flash drive (for Phoenix OS)
  • A 512MB or larger USB flash drive (for GParted)
  • A separate computer in order to prepare the USB flash drives

UEFI or BIOS Motherboards?

Older computers (2010 or older) mostly use Basic Input/Output System (BIOS) as a Power On Self Test (POST) environment. So, what does that mean?
A BIOS allows computers to start without an operating system. Newer computers replace BIOS with something called a Unified Extensible Firmware Interface (UEFI), which is more robust compared to the older scheme. Unfortunately, Phoenix OS doesn’t play nice with UEFI systems. And that requires configuring your UEFI to work with a non-Windows operating system (see step three below.)

Phoenix OS Installation Instructions

Step 1: Download Phoenix OS

The Phoenix OS installation package includes both 32-bit and 64-bit compatibility. That means you can install the operating system on older or newer hardware. Note, though, that the instructions in this guide rely on downloading the ISO image, not the executable.
android pc with phoenix os
Download: Phoenix OS

Step 2: Image Phoenix OS to USB Flash Drive

Once you’ve downloaded the Phoenix OS package, you need to image it onto a bootable USB drive using Rufus. Alternatively, you can use UNetbootin, but it can cause unpredictable behavior during the installation process.

Download: Rufus Portable [Broken Link Removed]
Next, run Rufus to image your downloaded copy of Phoenix OS to a USB drive. The USB drive must offer at least 8GB of storage.
Take note of the following: First, select your USB drive. Second, you can use GUID Partition Table (GPT), but I had zero success with it. Choose Master Boot Record (MBR) instead of GPT. Third, choose FAT32 for the file system. Fourth, make sure you’ve checked the boxes for Quick format and Create a bootable image using.
The rest of the defaults here should work.
android pc with phoenix os
  1. Select your USB flash drive.
  2. Under Partition scheme and target system type, choose MBR.
  3. Check the boxes for Quick format and Create a bootable disk using (and choose Phoenix OS from wherever you downloaded the .ISO file).
  4. The other defaults should work fine. Choose start.

Step 3: Configure Your BIOS/UEFI

Configuring the BIOS/UEFI (BIOS explained) is the hardest step. You’ll also nee to know how to enter your computer’s BIOS. Motherboard manufacturers do not use a common language for their BIOS settings. For example, you will need to turn something called Legacy Mode on.

Unfortunately, different board manufacturers may use different language to describe this feature. Additionally, you may need to disable Windows-specific features. In your POST environment, some manufacturers refer to it as Windows 7 mode. Others called it Windows 7 or Other Operating System Mode. And there are other variations, as well.
android pc with phoenix os
You will also want to turn off any Fast Boot and Secure Boot options. Fast Boot and Secure Boot are designed for Windows computers — Phoenix OS is Linux-based so there’s no reason to leave them on.
  1. Turn Legacy Mode on, if possible.
  2. Choose Windows 7 mode or Linux mode, if possible.
  3. Turn off Fast Boot and Secure Boot, if possible.

Step 4: Prepare Your Target Drive for Installation (Optional)

Why is this step optional? The only reason you need this step is to change the boot drive’s partition table from GPT to MBR. Many older drives come with MBR as its partition table as default. If you already know whether or not the drive is MBR, skip this step. I should also note that GPT sometimes works with Phoenix OS. In my experience, though, it does not.
Download GParted for this step. GParted is a partitioning utility. Among its many features, it can prepare a storage drive for receiving an installation of an operating system. The specific function that you need is to format the storage drive’s partition as MBR.
Download: GParted Live USB
To format a disk as MBR, simply image GParted onto a USB drive and boot your computer with the USB Flash drive inserted. The steps after GParted boots are simple: choose the default options (just hit enter when prompted).
I won’t get into lavish detail here, but you will need to remove the current partitions on your disk and create a Microsoft DOS partition table on the disk. To do so, choose Device and then Create Partition Table from the context menu.
android pc with phoenix os
Finally, at Select new partition table type prompt, choose msdos. Then hit Apply.
android pc with phoenix os
That should write the new partition table to the disk. You can now exit this program.

Step 5: Prepare Your Computer for Phoenix OS

The installation process is straightforward. First, insert the installation USB drive into your computer and boot from the drive. Remember: the installation process outlined here is destructive.
You should see a menu that looks like this:
android pc with phoenix os
Choose Installation. From the next menu, select Create/Modify partitions. Optionally, if you just want to see if Phoenix OS works on your system, choose Live CD. If it boots, congratulations, your system is compatible!
android pc with phoenix os
You may receive the prompt Do you want to use GPT? Choose No. As discussed earlier, using GPT is a disaster on Phoenix OS.
The following window looks like this:
android pc with phoenix os
In this menu, you must use the left and right directional keys for navigation.
First, hit the right key to select New and then hit enter, which creates an entry called sda1. Second, choose Primary and use the default drive size (which should be the entirety of your drive). Then, third, choose Bootable as the last option. Be careful that you don’t accidentally remove the Boot flag by pressing enter more than once.
android pc with phoenix os
Select Write to commit the changes to your drive. However, just before writing the changes, you’ll receive a prompt asking: Are you sure you want to write the partition table to disk?
You must manually type in the word yes and hit enter. Then the format tool writes the tables to disk. After it writes, choose Quit. This returns you to the Phoenix OS partition selection menu.

Step 6: Install Phoenix OS to the Target Drive

Choose sda1 and hit Enter.
android pc with phoenix os
From the Choose filesystem menu, select ext4 as the filesystem.
android pc with phoenix os
The installer will ask for confirmation (this step will create an ext4 partition, which wipes out the previous data on your drive). Choose Yes.
android pc with phoenix os
It may ask if you want to install an EFI GRUB2. Considering that your disk should be formatted as GPT, you will select Skip.
android pc with phoenix os
It will then ask: Do you want to install boot loader GRUB? Choose Yes. You’re pretty much done at this point. After it finishes installing, you’ll see the following menu:
android pc with phoenix os
You can select either Run Phoenix OS or Reboot. If you choose to Reboot, remember to remove your installation USB drive from the computer.

Using Phoenix OS as an Android PC

Phoenix OS Is Nougat + Windows

Phoenix OS looks like Android Nougat but with a desktop interface. Most apps open in windows, meaning they don’t occupy the entirety of the screen.
Like a desktop, Phoenix OS also includes such features as “snap”, where you can shift a window to the left or right half of the screen. This may not last, though, as Remix OS (how to install Remix OS) offered the same feature and removed it later on. I’m not sure why, but copyright may be the culprit.
android pc with phoenix os
The snap feature allows for Android to function in dual-window mode. To illustrate, opening an app and holding the Windows key (or command key) and hitting either the left or right directional key will cause the app to resize and change position. Below is a screenshot of Phoenix OS’s dual-window mode in action. It’s handy for writing papers and more.
android pc with phoenix os

Phoenix OS Limitations

A lot of games won’t play correctly using a mouse and keyboard interface. And on top of that, there are a few features that need polish. For example, if you want to highlight large swathes of text, you have to click, hold, and then manually select the text you want. It’s three times as time-consuming compared to a Windows or Mac computer.
Even though Phoenix OS’s developers designed the operating system to work on Atom-based systems (best Linux distributions for Atom processors), it will still install on most newer computers. I should note, though, that most computers will boot, but they won’t work properly with Phoenix OS installed. For example, HDMI audio rarely works.

Should You Install Phoenix OS?

If you have a computer with an Atom-based processor, like a netbook, it’s worth trying out. Phoenix OS has two big advantages: first, it’s fast. Second, it gives you access to the Android app library.
The issue with Phoenix OS is that it doesn’t work on every computer the way Windows does. So a lot of people will install it thinking it can make older hardware faster. It can, but rarely does it work without problems.
Do you love using Android on a computer? Let us know in the comments.